Processing is a powerful generative art library available in a number of languages including Java, JavaScript, Android, and iOS. Circles and ellipses are among the many geometric functions processing afford artists. They are particularly useful in helping to place items in an evenly distributed manner.
This tutorial will walk through the process of creating a circle to be used as a guide for spacing objects evenly. We will use a bit of trigonometry and a handful of P5JS’s handy functions. By the end—we’ll be creating a circle onto which we can evenly space any number of objects we choose!
Quick Trigonometry Refresher
We don’t need much math to make this magic happen but some basic trigonometric knowledge is a must. Specifically, we need to know how to find a point on a circle given the radius, angle, and in our case; the relative position of the circle’s origin. This means we need to find the x-coordinate and y-coordinate. The formula for these points—using the unit circle—are as follows:

These are the functions we will implement using P5JS to get a point on our circle. By using angles that are fractions of 2*PI (a.k.a. 360 degrees) we can determine how much space a point on our circle should have between itself and the neighboring points. Enough chatter—let’s start coding!
Step 1: Draw a Reference Circle
The first step is to draw a circle on which our points will be placed. P5JS offers two primary means of achieving this. The first, using the built-in circle method, is the most straightforward approach. Alternatively, we could use the ellipse function but there is no particular need in this case. Create a circle with the following code:
/**
 * Initialization function by P5JS
 */
function setup(){

    // Creates the HTML canvas object to which all
    // drawing is projected.
    createCanvas(1360, 768)

    // Fills the canvas object with a background color
    background("#efefef")
}

/**
 * Primary update function called each frame by P5JS
 */
function draw(){

    // Define styles of our geometry (circle)
    stroke('black')
    strokeWeight(15)
    noFill()

    // Create the circle
    circle(width / 2, height / 2, 512)
}
In this script, we’ve created a canvas object of size 1360px x 768px, added a background color, and created a circle object with a black stroke color and no fill. Here’s the image, that will serve as our jumping-off point:

Step 2: Draw a Point on the Circle
We need to first draw a single point on our circle before we start loading this circle up with lots of points. This can be accomplished by applying the two formulas from above with the following code in our draw() function just after we’ve drawn the circle:
// Draw a single point
let angle = 0;
let x = diameter / 2 * Math.cos(angle);
let y = diameter / 2 * Math.sin(angle)
stroke('red')
strokeWeight(25)
point(x, y)
In this block we’ve created a new variable for the angle we’ll use for calculation. In math class, you’ll hear this called theta (Θ). We’ve also created two variables x, y to make the calculations more clear for our angles. After that, we’ve told P5JS we want the point to be red and of size (strokeWeight) 25. This results in the following image:

Yikes. We’ve created a point all right but it doesn’t seem to be where we wanted it. So what gives—were our calculations wrong?
Step 3: Adding an Offset
The issue is that when using unit circle trigonometry one assumes the origin (middle point of the circle) is at the x,y coordinates (0, 0). Ours is located at 680 (width / 2), 383 (height / 2). To fix this, we need to relocate our point or origin as shown in the following image:

This is an issue because P5JS uses a coordinate system where the upper-left of the canvas is the origin. See here for a more in-depth discussion. To remedy this situation we need only add a simple offset to our equations by updating our code in the following way:
// Use trigonometric functions to calculate a point
// on the circle and adding an offset to account
// for the position of our circle's center.
let x = diameter / 2 * Math.cos(angle) + width / 2;
let y = diameter / 2 * Math.sin(angle) + height / 2;
Note we’ve added calculated values of width/2 and height/2 for our circle’s center coordinates. These are P5JS built-in keywords that return both the width and height of the canvas object we created in the first step. This makes our trigonometric functions relevant to the center of our circle rather than the world (0, 0) coordinates that happen to be at the top-left corner of the canvas object. This tweak produces the following image:

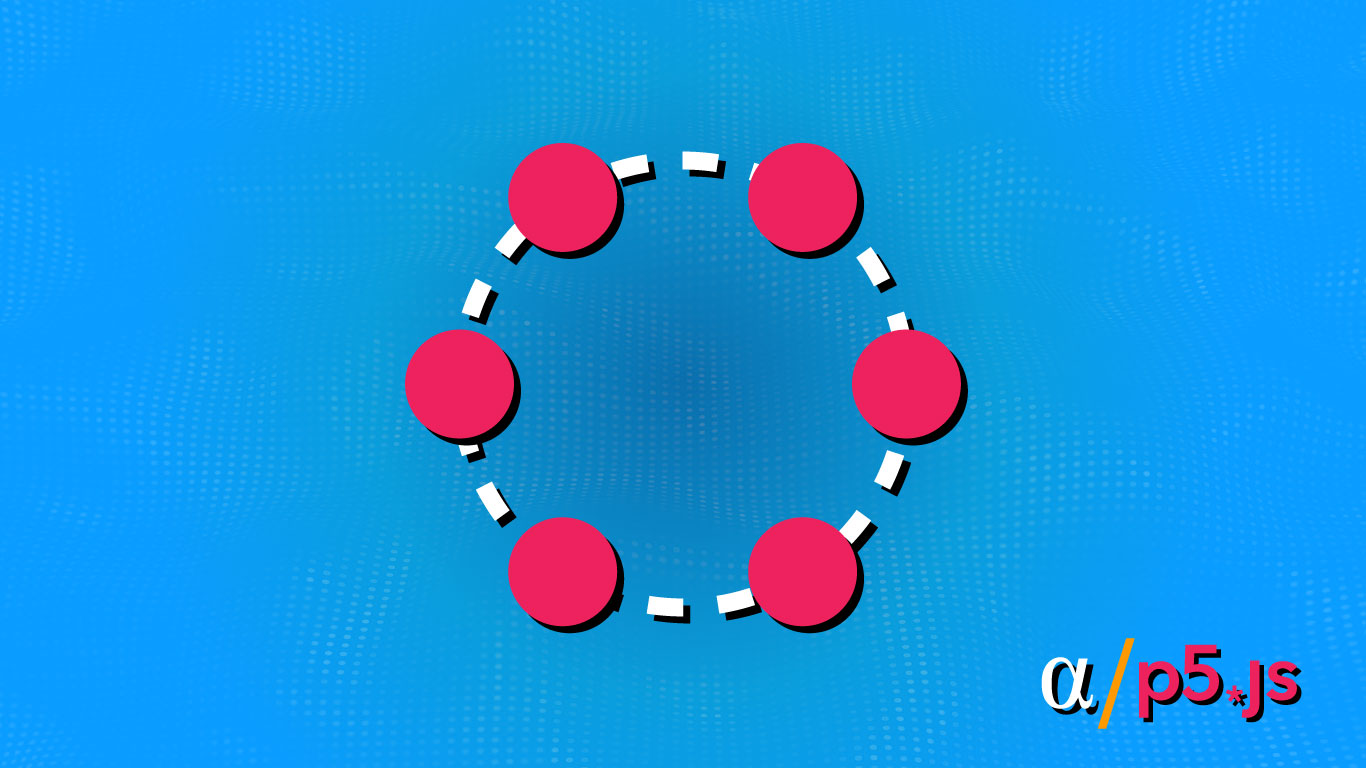
Step 4: Adding Multiple Points
Now that we have figured out how to add a point to our curve we can begin conceiving of how to add multiple points. We are going to approach this problem iteratively, adding a series of points one after another. However, we need to increment our angle during each iteration to ensure our points aren’t overlapping. We’ll approach this with the following update to our draw() function:
// Create and initialize a variable for the
// Number of points to be drawn on our circle
let pointCount = 6;

// Create and initialize a variable from which
// we will start drawing points.
let angle = 0;

// Iteratively draw points incrementing by 360 / pointCount
for(let i = angle; i < 360 + angle; i+=360 / pointCount){
    let x = diameter / 2 * Math.cos(i) + width / 2;
    let y = diameter / 2 * Math.sin(i) + height / 2;
    point(x, y)
}
Here we’ve used an iterator i set to an initial value of angle which loops in increments of 360 / pointCount until reaching a value of 360 + angle. The + angle component ensures that if we start our angle at a non-zero value we will continue to increment until the start angle is reached. Let’s see the result:

Yikes. Here we’ve created the correct number of points. There also seems to be some form of spacing going on—but certainly not an evenly distributed spacing. The issue is that we are using 360—a value in degrees—when P5JS expects a value in radians by default. We can remedy this by using one of two following adjustments;
- Using the
radians()function to convert the values of degrees; - Using a built-in value of PI (P5JS’s
PIor JavaScriptsMath.PI);
The Unit Circle presents values calculated in terms of radians. As such, most trigonometric functions use radians by default. Fortunately, any language worth its salt provides built-in methods to convert radians to degrees or easily use values of PI. Check out this video by Khan Academy for more information on Radians vs. Degrees.
Below illustrates both a PI-relative approach and a degrees-to-radians approach
///////////////////////////////////////////////////////////////////
//// Radian Conversion Approach

// Replace Angle with PI
let angle = PI;  // 0 would still work here
let pointCount = 6;

// Update 360 to TWO_PI, still offset via angle
for(let i = angle; i < TWO_PI + angle; i += TWO_PI / pointCount){
    let x = diameter / 2 * Math.cos(i) + width / 2;
    let y = diameter / 2 * Math.sin(i) + height / 2;
    point(x, y)
}

///////////////////////////////////////////////////////////////////
//// Radian Conversion Approach

// Create a circle with angles converted from degrees
let angle = 0;
let pointCount = 6;
for(let i = angle; i < radians(360 + angle) ; i += radians(360 / pointCount) ){
    let x = diameter / 2 * Math.cos(i) + width / 2;
    let y = diameter / 2 * Math.sin(i) + height / 2;
    point(x, y)
}
Here we see both approaches—using P5JS’s TWO_PI (equivalent to PI * 2 or Math.PI * 2) as well as the radians(360 / pointCount) approach. Whichever approach we might choose, the following image will be produced:

Getting Creative
Locating points along a circle can give rise to all sorts of possibilities. One can use them to create irregular grid designs, influence flow fields, or just see what type of patterns one can generate by fiddling around with the radius, point spacing, and visualizing those connections. Below is a grid of images created using points spaced evenly along a curve to direct the output of a recursive algorithm:

Final Thoughts
P5JS (and Processing generally) is a powerful visualization tool. Mastering fundamental operations, such as spacing objects evenly along a circle’s border, can help build a robust toolkit by which one can create mesmerizing generative art. The positions of these dots—as well as the circle—can serve as placements for other objects.
Adding in unique combinations of offsets, random variance, color, size, shape, etc. can build to create truly complex artwork. And to think—all this is possible because we figured out how to evenly space a few points along the border of a circle! If you’re looking for more fundamentals check out the article on how to draw a squiggly line in P5JS!