Discord is a powerful communications application used by a huge community of gamers, developers, and cryptocurrency enthusiasts. There is an ocean of unique Discord bots admins can add to their servers. For those more inclined to take matters into their own hands—there are also powerful APIs for creating Discord bots.
By using Discord.js one can make a Discord bot using Javascript with relative ease. In this Discord bot tutorial, we’ll walk through all the essentials to get a bot deployed to our Discord server. Before diving in completely, let’s first consider some basic requirements needed to get a Discord bot up and running.
Quick Introduction
Discord uses an HTTP API for which there are plenty of wrapper libraries in various languages. For our discussion here, we’ll be using the JavaScript wrapper Discord.js. This library provides a robust set of high-level interfaces for interacting with the Discord API. In this tutorial, we’ll cover the following topics:
- Project Setup + Installing libraries
- Ensuring the proper version of Node.js is installed
- Registering an application in the Discord developers portal
- Configuring our bots’ permissions
- Coding the bot’s logic in Discord.js
By the end of this tutorial, we will have a fully functioning Discord bot that can be deployed to a server of our choosing. This tutorial assumes readers are familiar with basic JavaScript syntax, basic Node.js project configuration, and installing packages via npm.
Step 1: Project Setup
To get started we need to complete the following tasks:
- Create a new project folder with relevant files
- Initializes a new Node.js project
- Install dependencies
- Update Node if necessary
We’ll break these steps down, one by one, to make sure our application gets started on the right foot. First up, let’s create a new project folder and initialize it as a new Node.js project
Note: These steps are being completed on a Windows 10 machine in the WebStorm IDE by Jetbrains.
Step 1a: Create a New Project and Initialize as Node.js Project
After creating a new project directory we need to initialize the project as a Node.js project. This can be done with the npm init command and results in the following output:
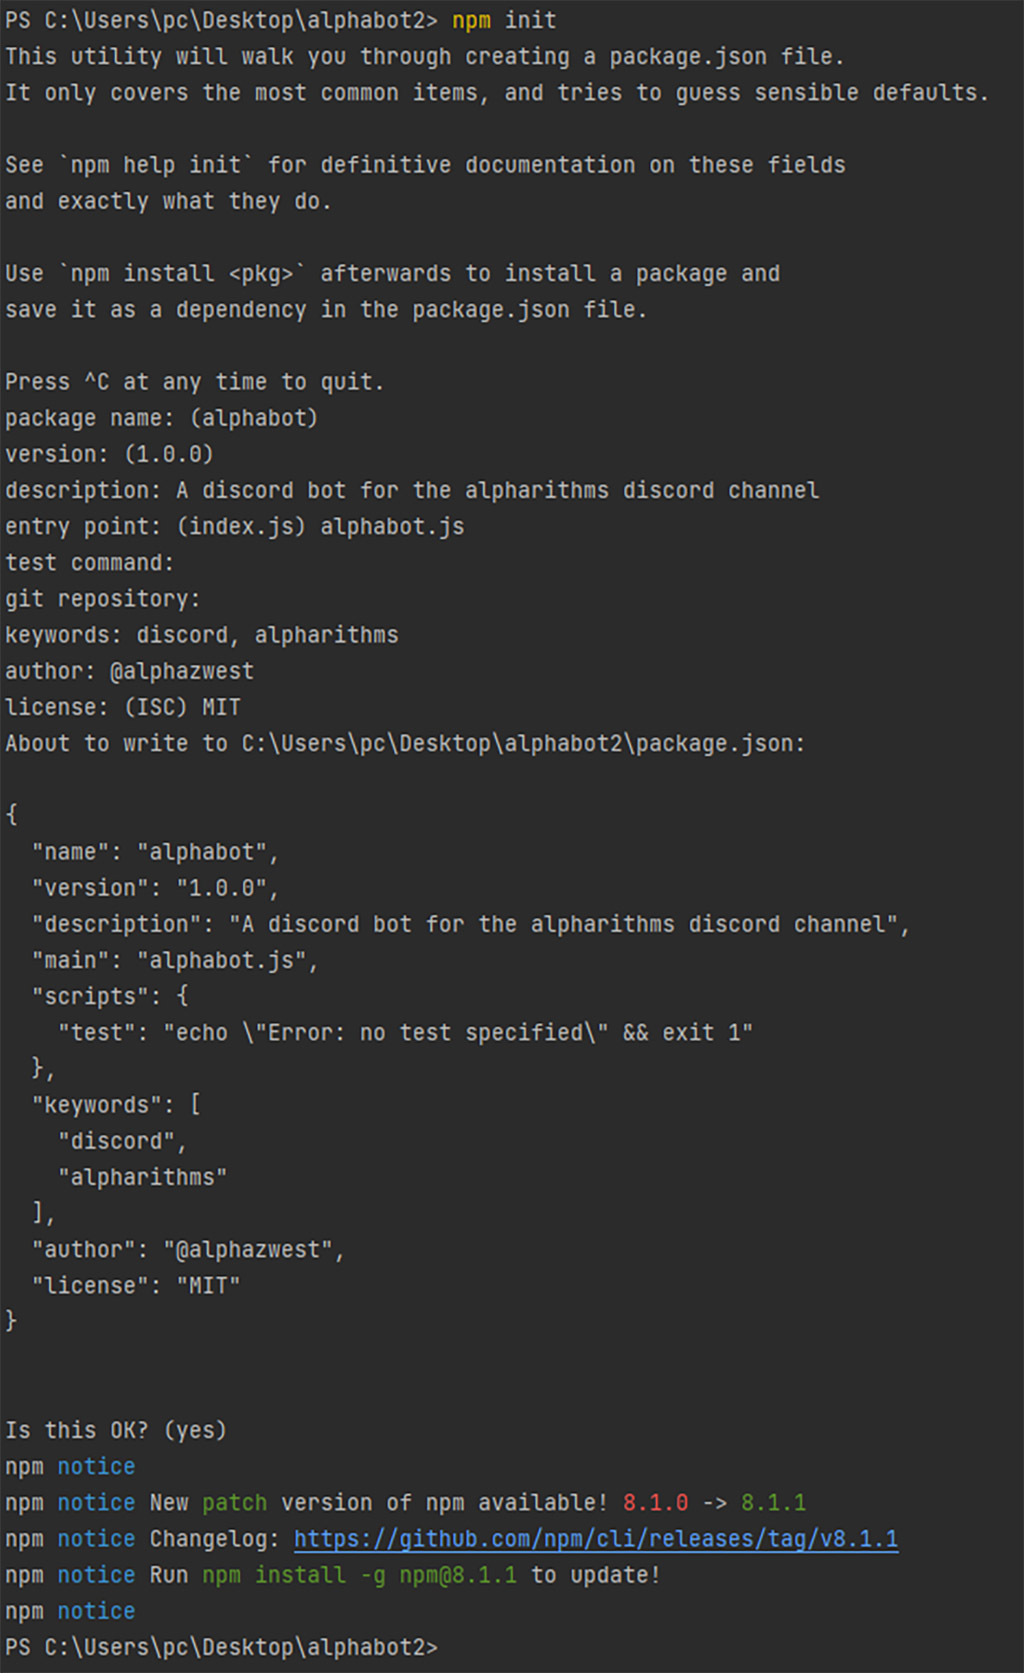
Alternatively, we could use npm init --y to accept all the defaults generated by npm.
Step 1.b: Install Dependencies
We have to install some dependencies to give alphabot some pizzaz. The only essential library is Discord.js. However, we will also install dotenv to help manage alphabot’s token so our API calls can be properly authorized. These can both be installed in one line as such: npm i --save discord.js dotenv. The --save flag will ensure these packages are listed as dependencies in package.json. To be sure, we’ll confirm the contents of our package.json file to reflect the following:
{
  "name": "alphabot",
  "version": "1.0.0",
  "description": "A discord bot for the alpharithms discord channel",
  "main": "alphabot.js",
  "scripts": {
    "test": "echo \"Error: no test specified\" && exit 1"
  },
  "keywords": [
    "discord",
    "alpharithms"
  ],
  "author": "@alphazwest",
  "license": "MIT",
  "dependencies": {
    "discord.js": "^13.2.0",
    "dotenv": "^10.0.0"
  }
}
Step 1.c: Add a .env File to Hold our OAuth2 Token
Discord.js needs our application’s token to make calls to the Discord API. This can be hard-coded into our application, loaded via a text file, or any number of other approaches. In the spirit of good practice, we’re going to be using a system environment variable facilitated by the dotenv package.
To make this work, we need to create a new file named .env in our project folder and add the following information:
DISCORD_TOKEN={OUR_DISCORD_BOT_TOKEN}
We’ll cover how this works in just a bit. For now, let’s take a step back and make sure our project folder reflects all that is required. Our project structure should now look like this:
.
└── alphabot/
    ├── node_modules
    ├── .env
    ├── package.json
    └── package-lock.json
Optional: Update Node.js
As of Discord.js V13.0.0, Node.js version >=16.0.0 is required. At the time of writing, the current LTS version of Node.js is 14.18.1 which will not satisfy the requirement for Discord.js. More information on this can be found here. To remedy this situation, simply download Version 16.0.0 or greater.
With all this setup out of the way, our next step is to get a Discord application registered, create our bot, get an OAuth2 URL, and return to our project folder with an API access token.
Step 2: Register Discord Application
To get started we need to register an application. This is done via the Discord Developer’s Portal. To access this portal one must log in to the web browser version of Discord then navigate to the developers portal here. Click the New Application button in the top right of the browser window to register a new application.
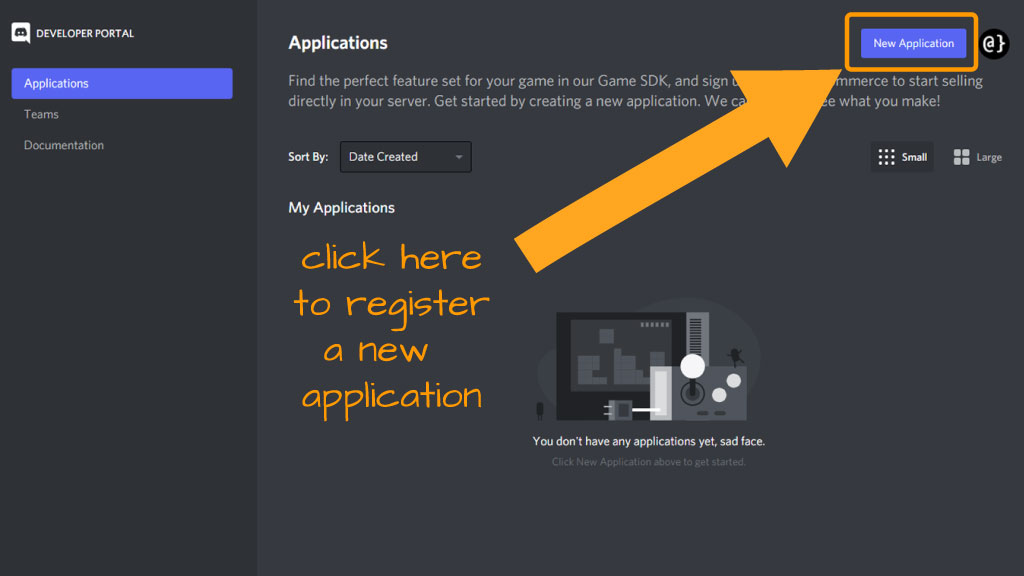
After clicking this button we’re prompted with a dialog to create a name for our application. In this case, we’re naming our bot alphabot. How creative—right? This is the next screen we’re shown:
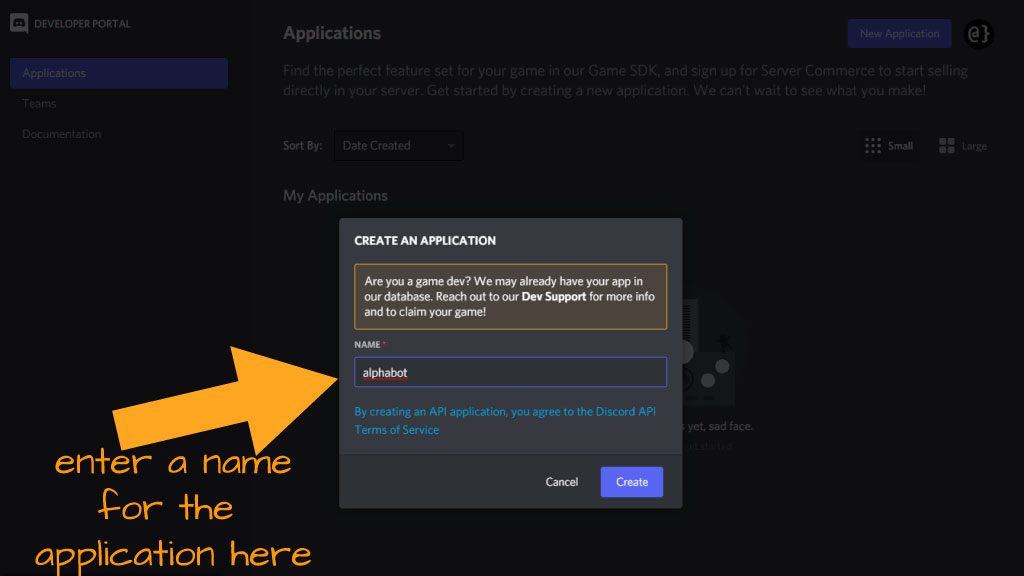
With this action, we’ve successfully created a new Discord application. Note: This is not a Discord bot yet. We still have to specify a few config options for that. Here’s the screen we are now shown:
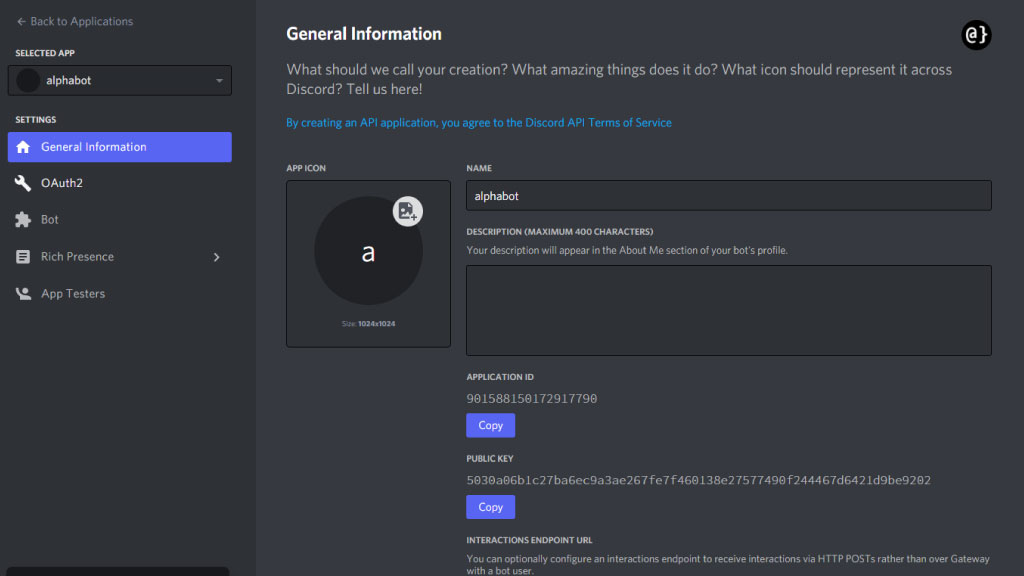
You’ll note on the left-hand side the menu has an option for Bot. This is where we’re going next. This will bring up permissions and authentication URLs for our new Discord bot as well as token information so we can begin coding our Discord bot. Once there, click the “Create Bot” button to reveal the following confirmation screen:
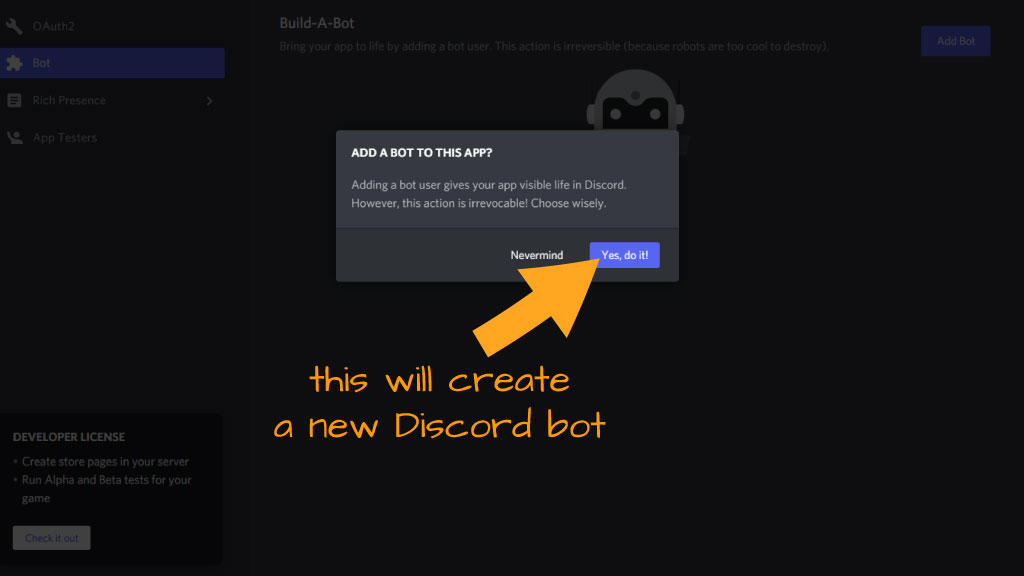
After confirming the creation of our new bot we will then land on the bot configuration page. There are several optional features we can enable here, though if our bot finds itself on more than 100 servers there may be some further verification and approval required. Read here for more details. These are the optional features:
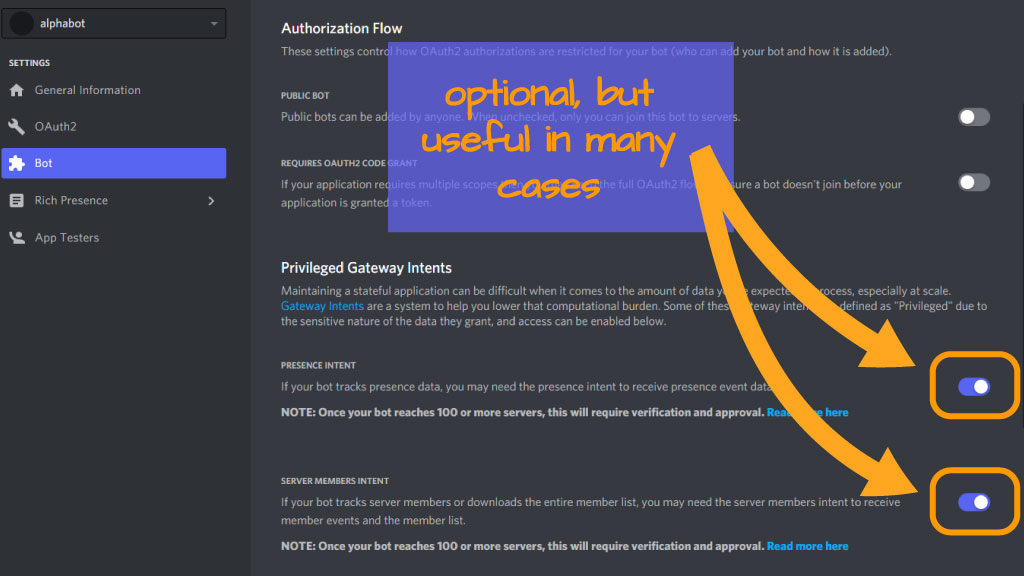
These options will give our bot a few extra permissions for interacting with users. These aren’t strictly necessary but, given the relative ease by which we can enable them, why not have the added scope. Next on our list is visiting the OAuth2 menu to set our bot’s scope and get an OAuth2 URL to authorize our new bot.
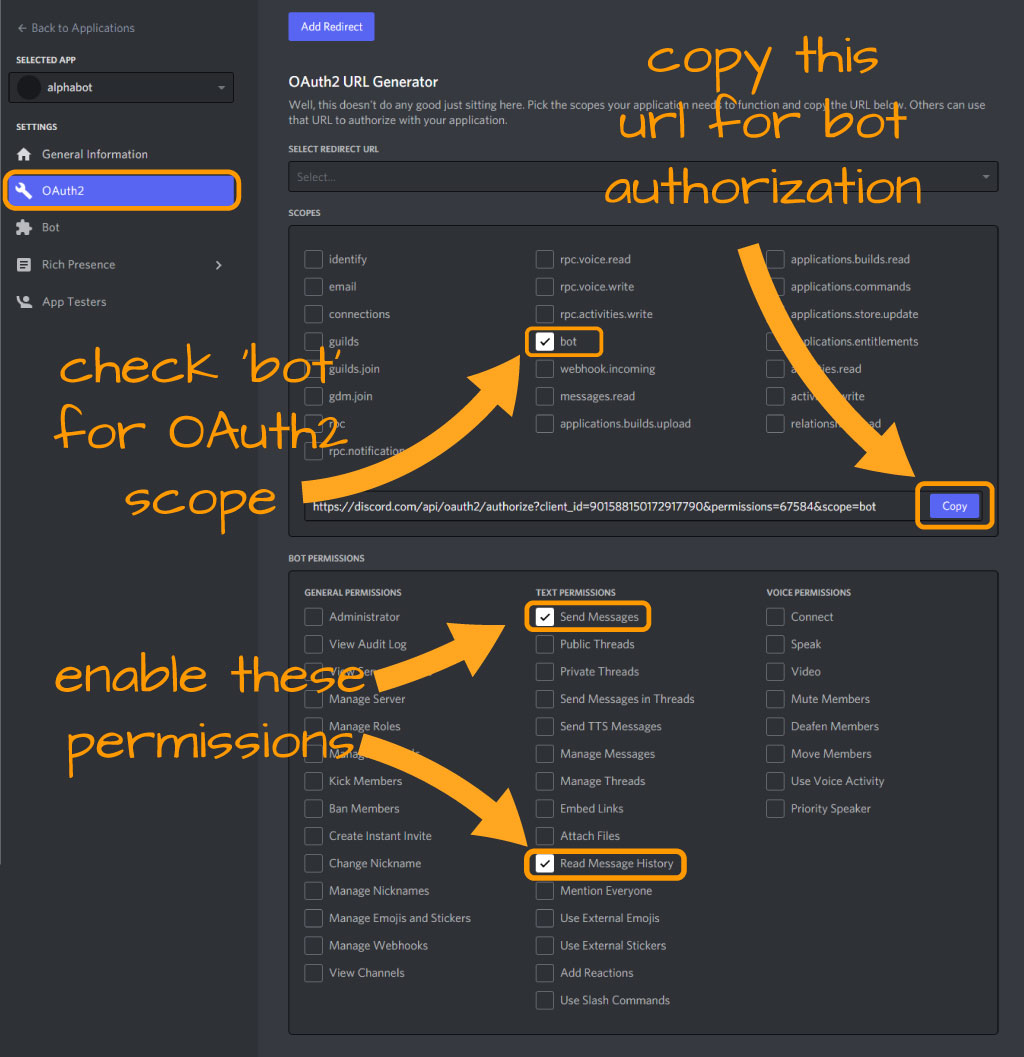
Next up is to copy the URL shown just below the Scopes panel and paste it into our web browser. This will authorize our new Discord bot so we can begin developing the code. We’re now shown the following screen after copy/pasting the OAuth2 URL into our browser of choice (Brave, right?):
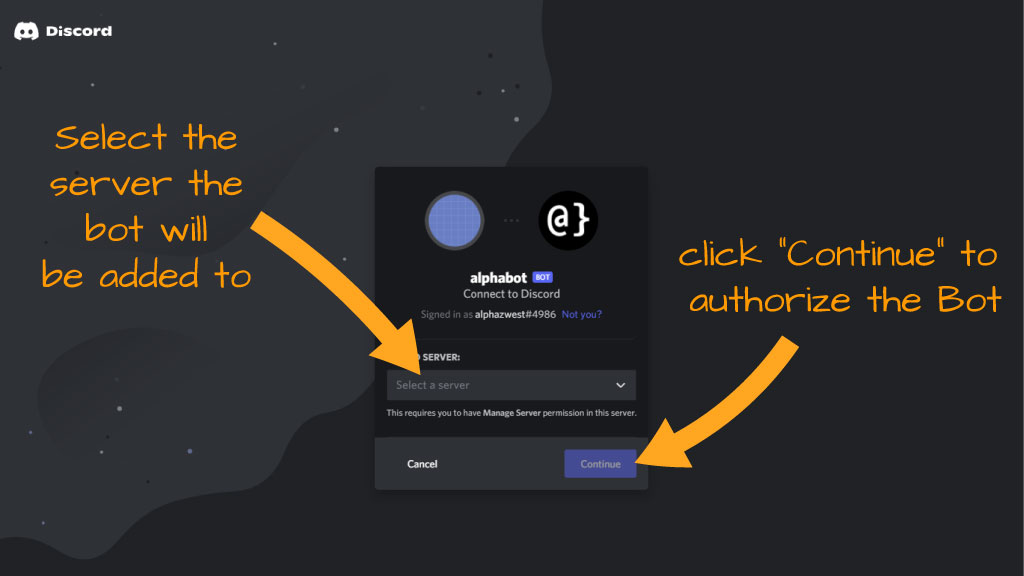
After successfully selecting our server and clicking continue we are shown one last confirmation screen summarizing the scope of permissions that our new bot will possess. Clicking the Authorize button will complete the process of creating our bot.
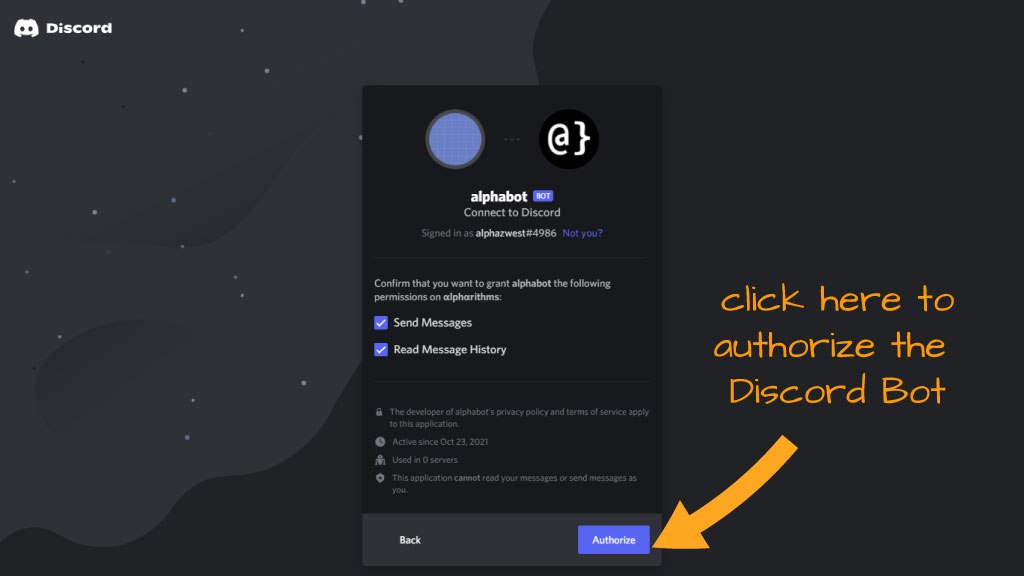
Note: there may be a captcha challenge here—fortunately, our humanity can be easily proven. Also, if you receive an error message nagging about the bot requiring “Code Grant” go back to the Bot menu and make sure the option “Requires OAuth2 Code Grant” is disabled. With this, we are shown the following screen indicating successful authorization of a new Discord Bot.
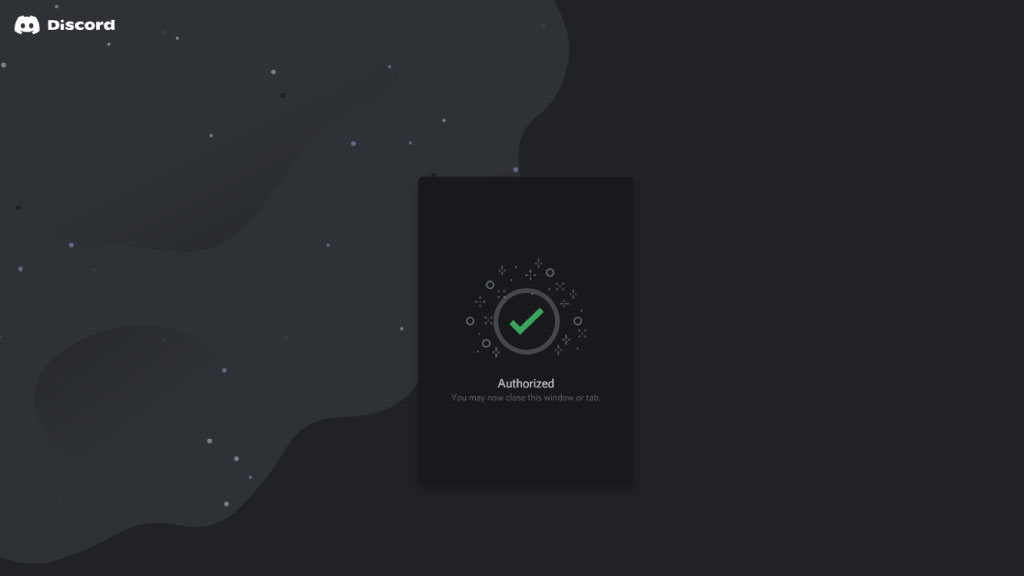
Now that our bot has been created and authorized, we can move on to creating the code for our bot.
Step 3: Code the Bot
Before we start coding, there is one final step to complete in the Discord application developers portal. We need to copy our Bot’s token in order to authorize calls from Discord.js.
Step 3.a: Copy OAuth2 Token to .env File
This is simple and can be done by clicking the Copy button from the Bot menu as shown in the following image:
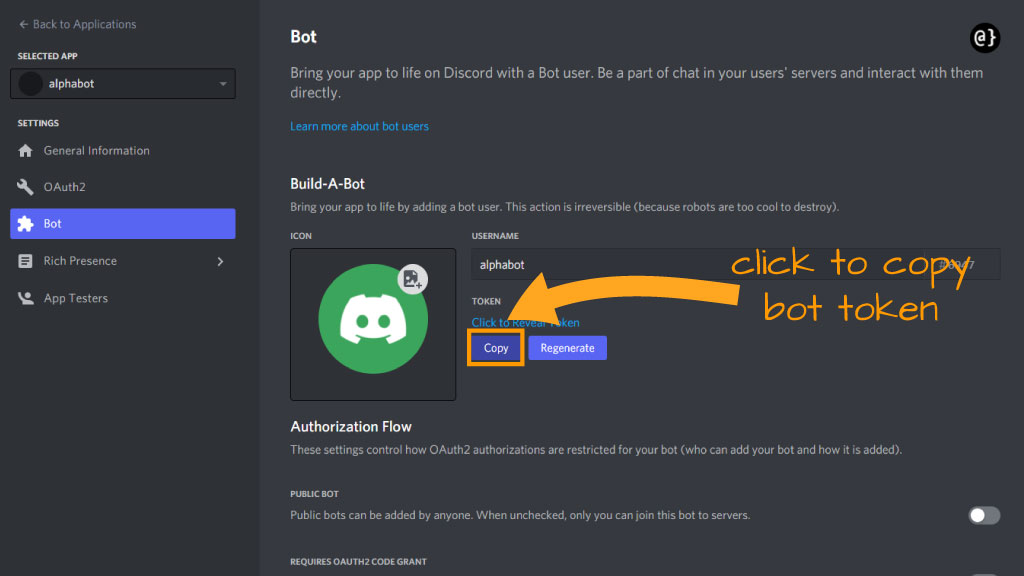
Once copied, we’ll add our bot OAuth2 token to the .env file in the following format:
DISCORD_TOKEN=INSERT_TOKEN_HERE
This file will load our token as a value for the Environment variable key DISCORD_TOKEN. Next up, we’ll create a file name alphabot.js in which our Bot’s main programmed logic will reside.
Step 3.b: Create Main File
Here we’ll create a file named alphabot.js in our main project directory. Our first order of business will be to set up our environment variables via the dotenv package, import the necessary classes from discord.js, and then instantiate a new Discord client. This is achieved via the following code:
// Setup our environment variables via dotenv
require('dotenv').config()

// Import relevant classes from discord.js
const { Client, Intents } = require('discord.js');

// Instantiate a new client with some necessary parameters.
const client = new Client(
    { intents: [Intents.FLAGS.GUILDS, Intents.FLAGS.GUILD_MESSAGES] }
);

// Notify progress
client.on('ready', function(e){
    console.log(`Logged in as ${client.user.tag}!`)
})

// Authenticate
client.login(process.env.DISCORD_TOKEN)
Note we are also authenticating via the named environment variable from our .env file. This authenticates alphabot with the Discord API. Before we can start testing alphabot we must be logged into Discord and have our server (the one alphabet was added to) open and visible. Once we are in Discord, we can check that our code is valid by running the following command: node alphabot.js. We should now see a new user—alphabot—listed as being online in our Discord server:
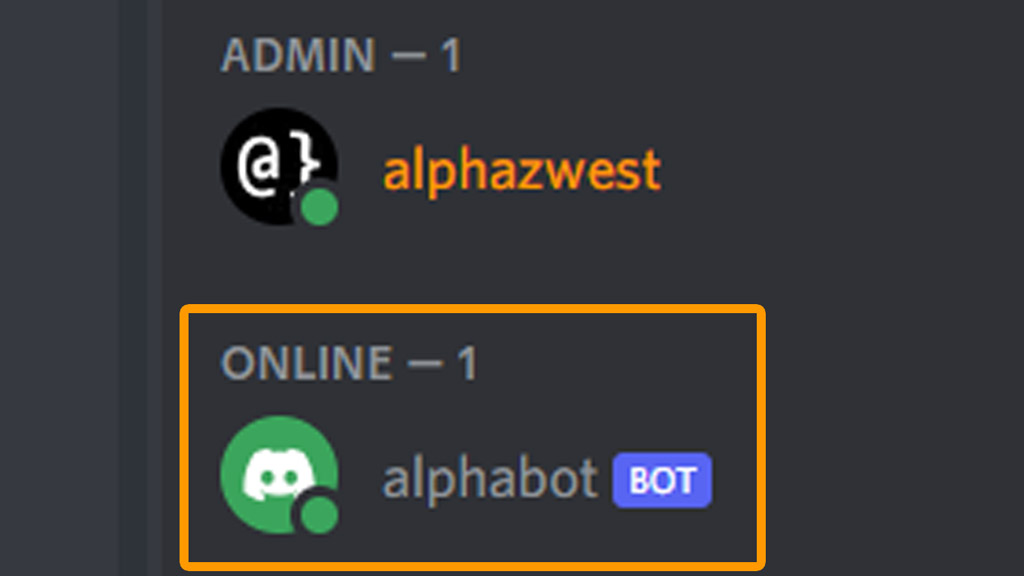
We will still see alphabot listed as a member even when it is not actively connected—just like any other member.
Step 4: Program the Discord Bot
At this point, we’ve done all the heavy lifting of getting alphabot up and running. The remainder of the work can be categorized as programming and development. This stage will be different for everyone.
To get a bit of a jump start—and demonstrate basic syntax usage—let’s make alphabot respond to some simple commands. We need only add a few lines of code to achieve this:
//Example Functionality
client.on('message',
    function(msg){
        if(msg.content === "Hello alphabot!"){
            msg.reply("Hello yourself!")
        }
    })
In this example, we’ve instructed alphabot to listen to the server chat for any message that exactly matches “Hello alphabot!” and—if detected—respond to that user with a reply of “Hello yourself!” This is achieved with the following lines of code:
//Example Functionality
client.on('message',
    function(msg){
        if(msg.content === "Hello alphabot!"){
            msg.reply("Hello yourself!")
        }
    })
We’ll have to close our previous Node.js instance down and re-start alphabot for these changes to take place. Once a restart has happened, we can type the phrase that we’ve coded alphapbot to respond to (Hello alphabot!). We should get a response as shown in the image below:
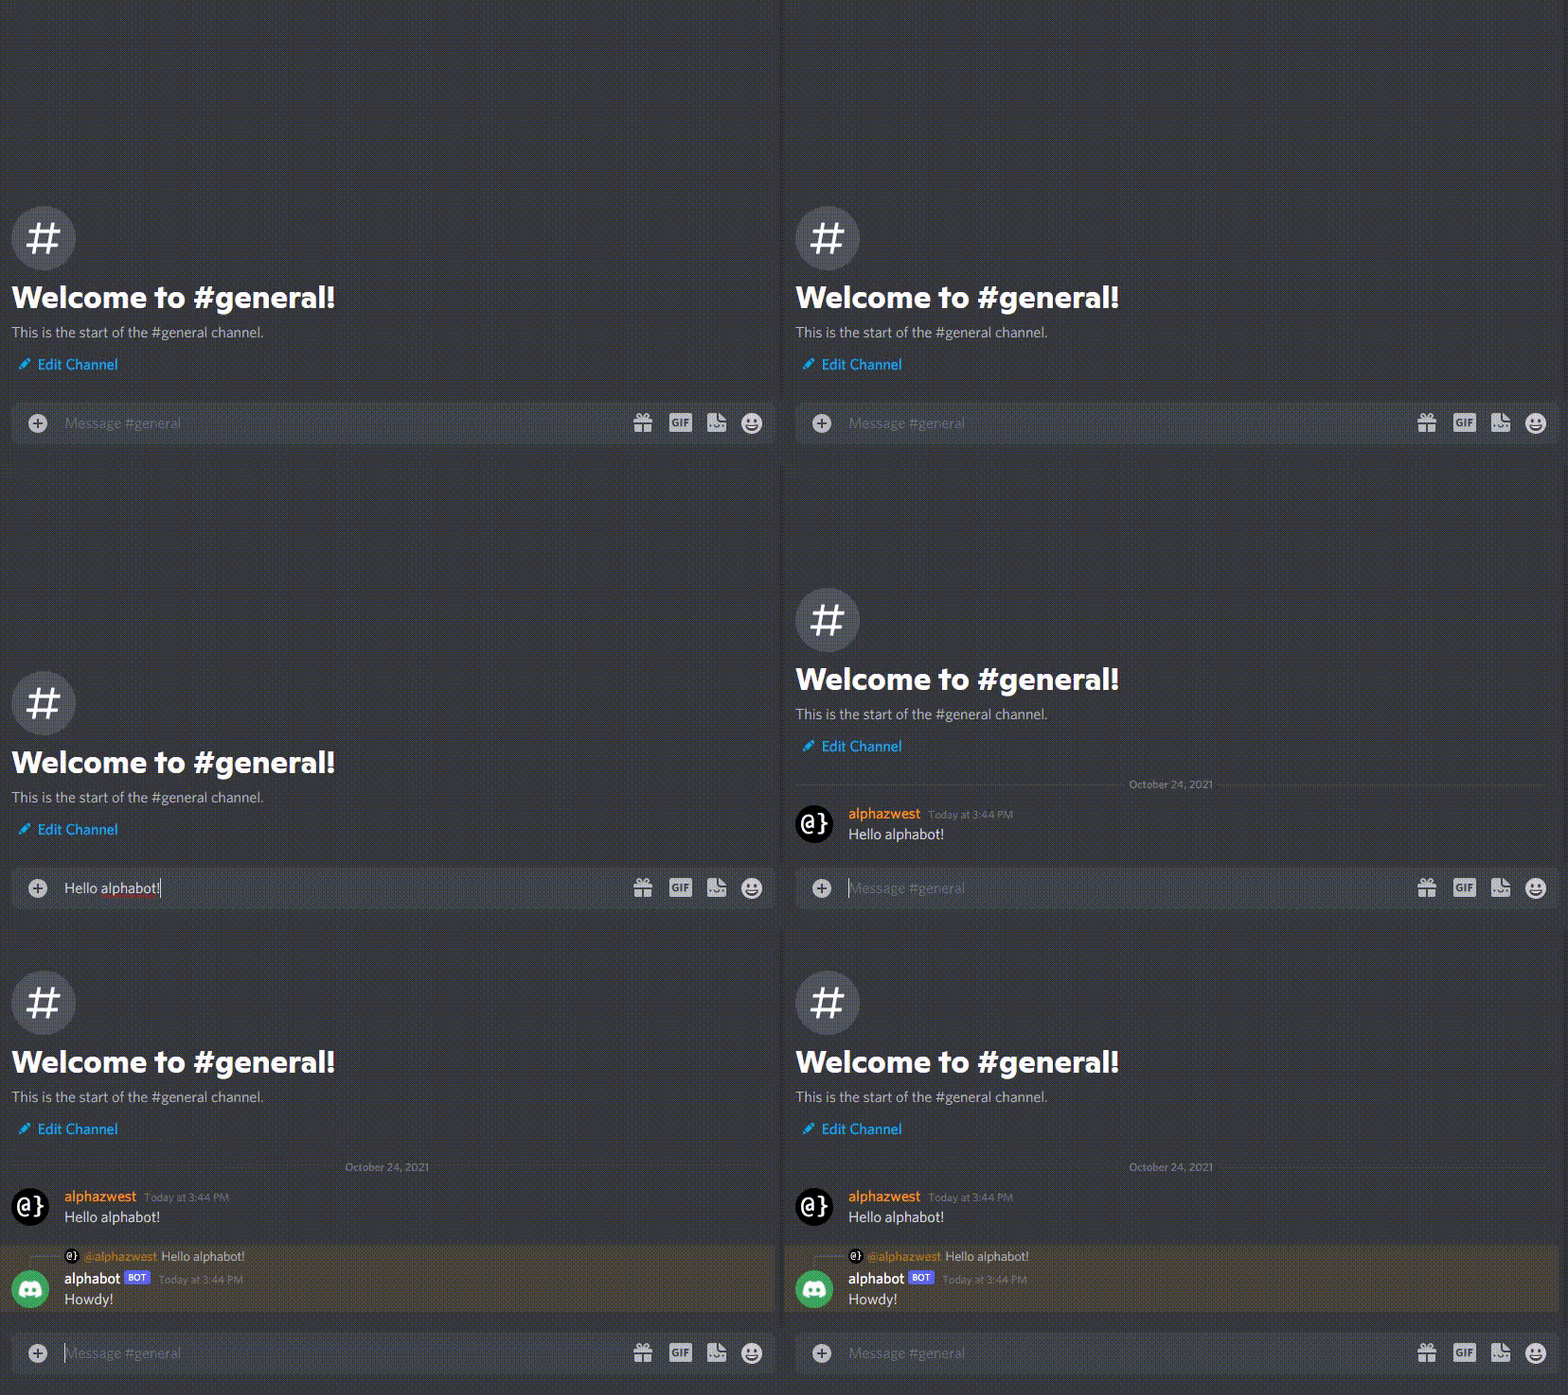
This wraps up all the basic requirements for creating a Discord app using Discord.js. We have created an incredibly simple bot. For most advanced users the code implemented here—after the initial setup—isn’t likely to steer the development of a Discord bot in any meaningful way.
Common Hurdles
As one codes the basis of a new Discord.js bot there are several common errors/issues that may arise. We’ve already covered the possibility of having to update Node.js to a newer version than the current LTS. Similarly, there are some other quirks that might need addressing based on which version of Node is running, which version of Discord.js, and several other factors. Below are some common gotchas.
Client Missing Intents
When instantiating a new Discord.js Client object it requires one specify several Intents objects for the type of interaction (a.k.a. user permissions in this case) that can take place.
Remember when we checked those boxes for Presence Intent and Server Member Intent earlier? This is where those come into play. See here for a full list of intents that can be passed in as arguments. A more concise listing of these intents is also provided via the Discord.js documentation.
Although our code here reflects the proper Intents objects being passed in as parameters—one might have found this post via a debugging search on Google. If that’s the case, keep in mind the instantiation of a Discord.js client should resemble the following syntax:
// Import relevant classes
const { Client, Intents } = require('discord.js');

// Crete a new Client instance with Intents specified
const client = new Client(
    { intents: [Intents.FLAGS.GUILDS, Intents.FLAGS.GUILD_MESSAGES] });
Bot Kicked from Server
During testing, all kinds of crazy can happen—and not always with good reason. If you find yourself in a situation where a Discord bot has been kicked or removed from the server you can easily add it back by re-authorizing. Take the following actions to complete this:
- Log back into the Discord Developers Portal
- Select Your Application
- Go to the OAuth2 Panel
- Select “Bot” and Desired Permissions
- Copy/Paste the OAuth2 URL into your browser
- Select which server to add the bot to
- Click all the right buttons to confirm
This process mirrors later actions from Step 2 above. This is the equivalent to being kicked from a server and having to re-join via a valid invite link. The OAuth2 URL is, essentially, an invite link for Discord Bots.
Putting it All Together
We’ve covered a fair amount of ground here. To recap:
- Created a new Discord application
- Defined the type as a Bot and set desired permissions
- Created a Node.js based project
- Implemented API calls via Discord.js
- Tested our bot to confirm functionality.
These are the basic essential steps required to get a Discord.js bot up and running. Below is a sample of our entire code strung together in one convenient block:
// Load token from .env file
require('dotenv').config()

// Import necessary Discord.js classes
const { Client, Intents } = require('discord.js');

// Instantiate new client object with desired Intents
const client = new Client(
    { intents: [Intents.FLAGS.GUILDS, Intents.FLAGS.GUILD_MESSAGES] });

// Authenticate
client.login(process.env.DISCORD_TOKEN)

// Notify successful connection via console
client.on('ready', function(e){
    console.log(`Logged in as ${client.user.tag}!`)
})

// Wait for message events, check content for match,
// respond cordially to user via reply.
client.on('message',
    function(msg){
        if(msg.content === "Hello alphabot!"){
            msg.reply("Howdy!")
        }
    })
A more general version of this code is available via Github here.
Final Thoughts
Discord has quickly become the go-to communications tool for gamers, developers, crypto enthusiasts—and companies. As communities grow it becomes essential to have a quality Discord bot to help with tasks such as moderation, community rewards, verification, and addressing common questions. The bot we’ve coded here clearly isn’t ready for such heavy lifting—but illustrates the basic moving parts one needs for the basis of a Discord bot.
For those looking to get a bot up and running asap, it’s recommended to use an existing solution. There are tons of Discord bots available that are well-developed and offer a range of useful features. In many cases, these bots are free or—at the very least—offer free plans where basic functionality is possible. Check out our article on the Best Discord moderation bots to get an idea of what’s available.


