Windows 7 offered users an invaluable shortcut to recent files via the operating systems native file explorer. In Windows 10 that feature is no longer available by default, sadly. Fortunately, getting this feature back can be done in a few easy steps.
Below are three methods that can restore the Recent Folders in Windows 10 option. Methods 1 and 2 represent the easiest approach, but may not result in permanent addition for all users. In such cases, step 3 offers a more advanced solution by editing the registry values for this option manually.
The Recent Folders location in Windows 10 has been thoroughly hidden. It’s still available but requires a bit of trickery to locate. To add this location to the Quick Access menu, complete the following steps, in sequence.
- Open a new instance of a File Explorer window (WinKey + E)
- Copy/Paste the code into the explorer address bar and press the Enter key
shell:::{22877a6d-37a1-461a-91b0-dbda5aaebc99}
- Right-click the “Quick Access” entry on the far-left side of the File Explorer window and click the “Pin current folder to Quick Access” option.
- Drag the newly-added Recent folder entry to the position you prefer. I place the entry on the top of the list on my PC.
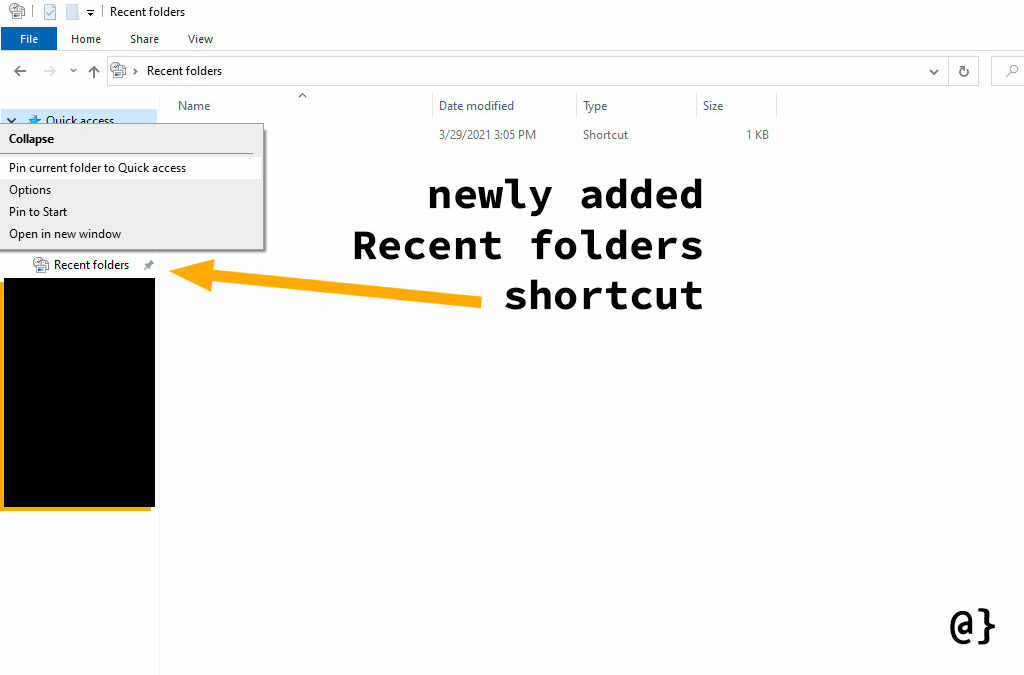
After these steps, you should be able to view the Recent folders entry on any instance of the File Explorer window opened, as illustrated below:

Method 2: Adding ‘Recent folders’ to Open/Save Dialog
The above instructions easily add an entry for Recent folders to the Quick Access menu. However, I find the most convenient access to Recent Places comes when opening and saving files. This approach allows one the same access to the Recent Folders location as in the above example but appears also when prompted with an Open/Save dialog.
To add the ‘Recent folders’ location to an Open/Save dialog we repeat the steps from above but this time we start from an Open/Save dialog rather than a generic File Explorer instance.
- Open any program from which you would save a file and issue the Save command. Note: some programs may require you to make a basic edit to a new document.
- In the file location bar, paste the same code from above:
shell:::{22877a6d-37a1-461a-91b0-dbda5aaebc99}
- Right-click the “Quick Access” entry on the far-left side of the File Explorer window and click the “Pin current folder to Quick Access” option.
- Again, drag the newly-added Recent folder entry to the position you prefer.
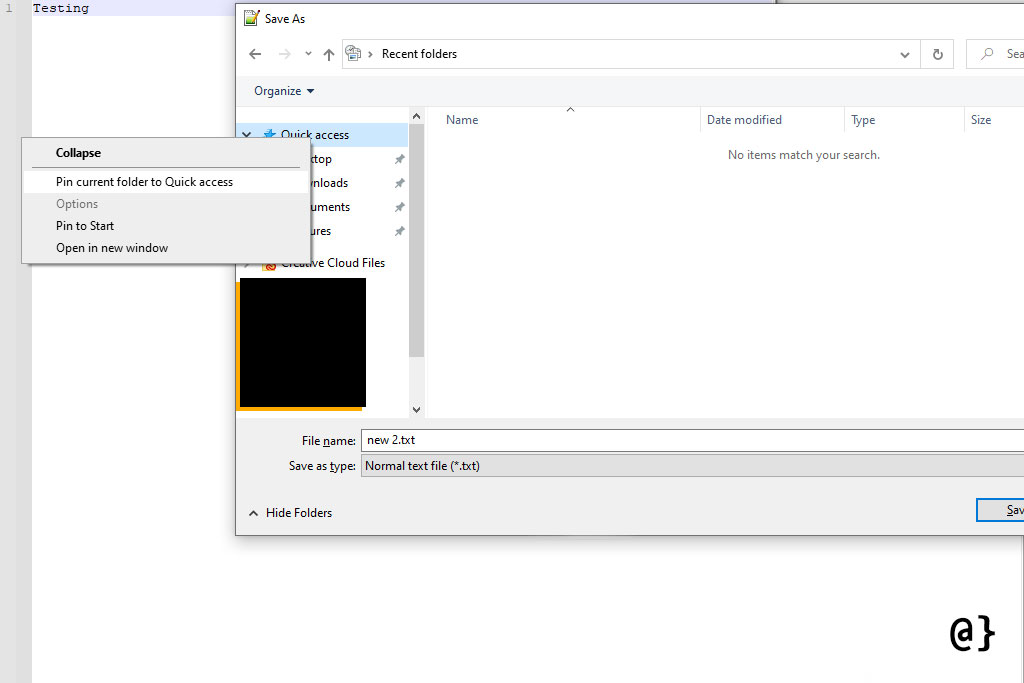
The following screen capture illustrates what you should see during the process of completing step 3 from above, just before the Recent folders open appears in the Quick Access menu.

I have seen some cases where the first approach has added the location to the Save/Open dialog as well. However, I’ve not been able to repeat that process wager step two will be required for the majority of users. In some cases, neither of these steps will permanently add the Recent folders to the Quick Access menu in both the Open/Save and File Explorer dialogs. For these cases, the following steps can be taken.
Method 3: Adding ‘Recent folders’ to Open/Save Dialog via the Registry Editor
Warning: This method is for more advanced users only. Create a system restore point and backup of the Windows registry before continuing.

- Perform the steps outlined in Method 1 above.
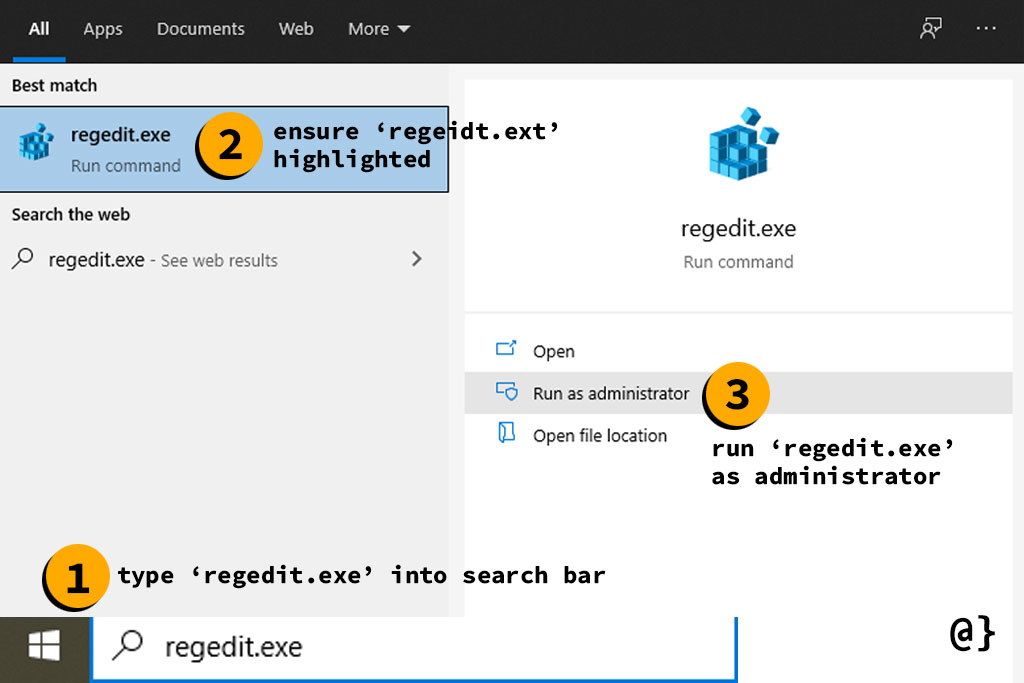
- Type
regedit.exeinto the search bar on the Windows taskbar, highlight ‘regedit.exe’, and then launch the program as administrator. - Navigate to the following registry key:
HKEY_CLASSES_ROOT\CLSID\{22877a6d-37a1-461a-91b0-dbda5aaebc99}\ShellFolder - Right-click on the ShellFolder icon and select permissions on the resulting context menu, then click Advanced.
- Click the blue change link at the top of the Advanced Security Settings for Shell Folder window.
- On the Select User or Group dialog window that pops up, type
ADMINISTRATORSinto the text field just below the Enter object name to select instructions, then click “Check Names”. - Click OK, Apply, then OK again in the Advanced Security Settings for Shell Folder dialog window.
- In the Group or User Names selection area, scroll down until the newly-added Administrator user is selected. It probably has a name unique to your computer like Desktop-09128081 or similar.
- Tick the box for Full Control, click Apply, then click OK.
- Back in the Registry Editor window, in the rightmost pane, double click the Attributes entry which will popup a new dialog box prompting for a new
DWORDentry for the Attribute value. - Replace the existing value of
20040000with70010020, then click OK - In the leftmost panel again, navigate to the following registry key:
HKEY_CLASSES_ROOT\Wow6432Node\CLSID\{22877a6d-37a1-461a-91b0-dbda5aaebc99}\ShellFolder - Repeat steps 4-11 from above starting by clicking on the new ShellFolder instance in the
Wowo6432\CLSID\ location - Close the Registry Editor window (it saves automatically)
Tip: You can navigate through the registry editor quickly by typing the first few characters of each directory level out. This does require the { of the {22877 value.
Any application that uses the Windows Open/Save dialog will now automatically include the Recent Folders as an option in the Quick Access menu. The inclusion of this option has saved me thousands of clicks over the years and I still cannot fathom why it was excluded from the default Windows 10 features set.
Final Thoughts
I fought the change to Windows 10 for years–hanging onto a copy of Windows 7 nearly until Microsoft announced its End of Support. I have since found it to be a solid OS but not without its quirks. The removal of the Recent Folders has been the bane of my OS experience on a daily basis.
This post was inspired by the third time I have gone through the process of re-enabling this feature manually. I hope the steps outlined here can help other users regain the loss of efficiency in their workflow brought by this heinous exclusion of such a simple, yet essential, workflow feature.


