TypeScript is a language that brings static typing and features common to more advanced software engineering languages like Java and C#. ThreeJS is a JavaScript-based cross-browser 3D engine capable of building applications ranging from games to advanced 3d websites.
JavaScript was never intended to be used for large-scale applications. Research suggests that, since version 2.0, TypeScript can accurately detect 20% of common JavaScript errors1. TypeScript, Webpack, and ThreeJS are a powerful trio for developing browser-based 3D applications supporting the use of enums, static typing, and compiler error-checking.
Note: The code resulting from this project is available via Github
Highlights
Both JavaScript and TypeScript are among the most popular programming languages. ThreeJS is among the most popular JavaScript game engines. Combing the two seem like an obvious win. In this article, we’ll cover how to set up a basic ThreeJS scene in TypeScript that is compiled into a single browser-executable file. Here are the highlights:
- Basic scene setup via Node and npm
- Installing TypeScript, ThreeJS, and Webpack
- Creating some basic scene files and assets
- Creating a basic HTML page to launch the ThreeJS application
- Transpiling, bundling, and loading the ThreeJS application
- Loading the app in the browser
Note: This article uses a command-line-based approach but both TypeScript and Webpack integrate well with modern IDEs for convenient point-and-click use. Check out the article Configuring TypeScript with Webstorm for more information.
Assumptions
This article focuses on getting ThreeJS, TypeScript, and Webpack installed and coordinated for a browser-based ThreeJS application. To limit the length and complexity of this article, the following assumptions are being made:
- Node.js is installed
- Basic familiarity with the npm package manager
- Basic familiarity with JavaScript, TypeScript, and JSON syntax
- Basic familiarity with ThreeJS concepts
- Access to a basic webserver (webpack-dev-server, Webstorm, MAMP, etc)
This article doesn’t cover any language deeply and basic working knowledge of syntaxes is good enough to follow along. This article is not a ThreeJS tutorial and does not deeply discuss the inclusion of elements like cameras, lights, GridHelpers, and Dat.GUI systems. With that in mind let’s get started!
Step 1: Create a new Node Project
From the terminal or integrated terminal within an IDE, create a new Node-based project by executing the npm init -y command producing the following output:
{
  "name": "threejs-typescript",
  "version": "1.0.0",
  "description": "",
  "main": "index.js",
  "scripts": {
    "test": "echo \"Error: no test specified\" && exit 1"
  },
  "keywords": [],
  "author": "",
  "license": "ISC"
}
Next, create a src and dist directory in the project root via the touch command on Linux machines, the mkdir command on Windows machines, or by any other means you see fit. The project structure should now look like this:
.
└── threejs-typescript/
    ├── src
    ├── dist
    └── package.json
Step 2: Install Necessary Packages
We need several packages to make this project work. In addition to ThreeJS and TypeScript, we’ll need a bundling package called Webpack as well as packages that help connect everything and execute build commands from the command line. Here’s what’s getting installed:
- ts-node – A TypeScript execution and REPL for node.js with native ESM support.
- three – The official npm-available ThreeJS distribution.
- webpack – Bundling plugin we’ll use to combine everything into a single file.
- ts-loader – Connects ts-node and webpack to support combining transpiled
.tsfiles - webpack-cli – Enabling us to execute build commands from the command line.
- dat.gui – Basic debugging feature for ThreeJS
- @types – TypeScript definitions for both ThreeJS and Dat.GUI
All of these but three and data.gui will be devDependencies that will be installed while passing the --save-dev flag as follows:
nnpm install --save-dev ts-node ts-loader webpack webpack-cli @types/dat.gui @types/three
Now we will install the non-development dependencies with the following command:
npm install three dat.gui
Our project now has a node_modules directory in which all these packages and their dependencies have been installed as well as a package.lock file. It’s worth noting that we didn’t explicitly install TypeScript anywhere! The ts-node package handles this automatically as typescript is a dependency. After the bytes settle, our package.json file now reads as follows:
{
  "name": "threejs-typescript",
  "version": "1.0.0",
  "description": "",
  "main": "index.js",
  "scripts": {
    "test": "echo \"Error: no test specified\" && exit 1"
  },
  "keywords": [],
  "author": "",
  "license": "ISC",
  "devDependencies": {
    "@types/dat.gui": "^0.7.7",
    "@types/three": "^0.140.0",
    "ts-loader": "^9.3.0",
    "ts-node": "^10.7.0",
    "webpack": "^5.72.0",
    "webpack-cli": "^4.9.2"
  },
  "dependencies": {
    "dat.gui": "^0.7.9",
    "three": "^0.140.0"
  }
}
Step 3: Basic ThreeJS Scene Setup
Configuring Webpack would be the next step in most cases. However, we’ll set up a TypeScript-based ThreeJS project first to highlight the need for Webpack. Initially, our TypeScript project will not work in the browser — at which point Webpack will come to our rescue.
The use of ThreeJS objects and functions here will not be covered in-depth. However, it’s useful to at least know what’s in the scene. We’ll be adding a BasicScene.ts class and an index.ts file to our src directory. The scene elements are created in the BasicScene class and the index.ts file simply renders updates in a loop. Elements included in the scene are as follows:
- PerspectiveCamera – Handles FOV, zooming, and element visibility.
- WebGLRenderer – Renders elements for WebGL-based viewing.
- OrbitalControls – Allows basic scene movement via user interaction
- GridHelper – Displays a grid on the ground plane
- AxesHelper – Displays a colored gridline in each of the x, y, z axes.
- Lights & LightHelers – Lights the scene and provides a visual locator.
- Cube – A basic scene element.
- Dat.GUI Debug Window – Debugging tool that adjusts scene parameters in real-time.
- Window Resizing – Dynamically adjusts the scene size and aspect ratio on browser resizes.
These elements are, in my opinion, helpful and essential elements for a basic ThreeJS scene. We’ll not cover much about their configurations or purposes here since our focus is on getting them to work via TypeScript and Webpack. The creation, configuration, and initialization of these elements is done in the BasicScene class, contained in the /src/BasicScene.ts file now located in our project. The specifics of this file are not important for configuring Webpack or Typescript but simply a way to load something interesting into a scene. Below is the code with ample commenting for explanation:
import * as THREE from 'three';
import {GUI} from 'dat.gui';
import {OrbitControls} from "three/examples/jsm/controls/OrbitControls";

/**
 * A class to set up some basic scene elements to minimize code in the
 * main execution file.
 */
export default class BasicScene extends THREE.Scene{

    // A dat.gui class debugger that is added by default
    debugger: GUI = null;

    // Setups a scene camera
    camera: THREE.PerspectiveCamera = null;

    // setup renderer
    renderer: THREE.Renderer = null;

    // setup Orbitals
    orbitals: OrbitControls = null;

    // Holds the lights for easy reference
    lights: Array<THREE.Light> = [];

    // Number of PointLight objects around origin
    lightCount: number = 6;

    // Distance above ground place
    lightDistance: number = 3;

    // Get some basic params
    width = window.innerWidth;
    height = window.innerHeight;

    /**
     * Initializes the scene by adding lights, and the geometry
     */
    initialize(debug: boolean = true, addGridHelper: boolean = true){

        // setup camera
        this.camera = new THREE.PerspectiveCamera(35, this.width / this.height, .1, 1000);
        this.camera.position.z = 12;
        this.camera.position.y = 12;
        this.camera.position.x = 12;

        // setup renderer
        this.renderer = new THREE.WebGLRenderer({
            canvas: document.getElementById("app") as HTMLCanvasElement,
            alpha: true
        });
        this.renderer.setSize(this.width, this.height);

        // add window resizing
        BasicScene.addWindowResizing(this.camera, this.renderer);

        // sets up the camera's orbital controls
        this.orbitals = new OrbitControls(this.camera, this.renderer.domElement)

        // Adds an origin-centered grid for visual reference
        if (addGridHelper){

            // Adds a grid
            this.add(new THREE.GridHelper(10, 10, 'red'));

            // Adds an axis-helper
            this.add(new THREE.AxesHelper(3))
        }

        // set the background color
        this.background = new THREE.Color(0xefefef);

        // create the lights
        for (let i = 0; i < this.lightCount; i++){

            // Positions evenly in a circle pointed at the origin
            const light = new THREE.PointLight(0xffffff, 1);
            let lightX = this.lightDistance * Math.sin(Math.PI * 2 / this.lightCount * i);
            let lightZ = this.lightDistance * Math.cos(Math.PI * 2 / this.lightCount * i);

            // Create a light
            light.position.set(lightX, this.lightDistance, lightZ)
            light.lookAt(0, 0, 0)
            this.add(light);
            this.lights.push(light);

            // Visual helpers to indicate light positions
            this.add(new THREE.PointLightHelper(light, .5, 0xff9900));
        }

        // Creates the geometry + materials
        const geometry = new THREE.BoxGeometry(1, 1, 1);
        const material = new THREE.MeshPhongMaterial({color: 0xff9900});
        let cube = new THREE.Mesh(geometry, material);
        cube.position.y = .5;

        // add to scene
        this.add(cube);

        // setup Debugger
        if (debug) {
            this.debugger =  new GUI();

            // Debug group with all lights in it.
            const lightGroup = this.debugger.addFolder("Lights");
            for(let i = 0; i < this.lights.length; i++){
                lightGroup.add(this.lights[i], 'visible', true);
            }
            lightGroup.open();

            // Add the cube with some properties
            const cubeGroup = this.debugger.addFolder("Cube");
            cubeGroup.add(cube.position, 'x', -10, 10);
            cubeGroup.add(cube.position, 'y', .5, 10);
            cubeGroup.add(cube.position, 'z', -10, 10);
            cubeGroup.open();

            // Add camera to debugger
            const cameraGroup = this.debugger.addFolder('Camera');
            cameraGroup.add(this.camera, 'fov', 20, 80);
            cameraGroup.add(this.camera, 'zoom', 0, 1)
            cameraGroup.open();

        }
    }

    /**
     * Given a ThreeJS camera and renderer, resizes the scene if the
     * browser window is resized.
     * @param camera - a ThreeJS PerspectiveCamera object.
     * @param renderer - a subclass of a ThreeJS Renderer object.
     */
    static addWindowResizing(camera: THREE.PerspectiveCamera, renderer: THREE.Renderer){
        window.addEventListener( 'resize', onWindowResize, false );
        function onWindowResize(){

            // uses the global window widths and height
            camera.aspect = window.innerWidth / window.innerHeight;
            camera.updateProjectionMatrix();
            renderer.setSize( window.innerWidth, window.innerHeight );
        }
    }
}
This code handles the entirety of our ThreeJS scene configuration. However, we still need a basic “game loop” to update our scene on changes. This will allow the Dat.GUI debugger to cause changes visible in the scene, the cube object to move around, and the OrbitalControls class to work.
This code could be included easily enough as an e.g. loop method in the BasicScene class. However, having two files is essential for demonstrating the need of Webpack (or another bundler) so our game loop code will go in a /src/index.ts file as follows:
import BasicScene from "./BasicScene";

// sets up the scene
let scene = new BasicScene();
scene.initialize();

// loops updates
function loop(){
    scene.camera.updateProjectionMatrix();
    scene.renderer.render(scene, scene.camera);
    scene.orbitals.update()
    requestAnimationFrame(loop);
}

// runs a continuous loop
loop()
Note: ThreeJS scenes can be set up in many ways. This is a preferential approach with the only real requirement of having two separate files to highlight an issue later.
Step 4: Creating tsconfig.json
TypeScript’s compiler will turn our code into vanilla javascript based on specifications in a tsconfig.json file. This file can be created manually or via the tsc (typescript compiler) command available from the typescript package npm installed along with our ts-node installation. An initial version of this file can be created with the tsc --init command producing a tsconfig.json file in our project root that, after removing the massive number of auto-generated comments in the document, reads as follows:
{
  "compilerOptions": {
    "target": "es2016",
    "module": "commonjs",
    "esModuleInterop": true,
    "forceConsistentCasingInFileNames": true,
    "strict": true,
    "skipLibCheck": true
  }
}
Auto-generating this file is convenient but also produces a ton of invalid JSON comments. This doesn’t bother the TS compiler but is a lot of added text. At the time of writing, I’m not aware of a way to auto-generate this file without subsequent generation of all the comments.
A Note for Windows Users
For those on Windows machines, running the above command is likely to produce the following error message:
tsc : File threejs-typescript\node_modules\.bin\tsc.ps1 cannot be loaded because running scripts is disabled on this system. For more information, see about_Execution_Policies at https:/go.microsoft.com/fwlink/?LinkID=135170.
At line:1 char:1
+ tsc --init
+ ~~~
    + CategoryInfo          : SecurityError: (:) [], PSSecurityException
    + FullyQualifiedErrorId : UnauthorizedAccess
This is caused by Windows ExecutionPolicy settings, which defaults to Restricted for user accounts. Rather than changing the ExecutionPolicy, Windows will allow users to bypass the policy restriction for a single command via the following syntax:
powershell -ep Bypass -c "tsc --init"
Step 5: Customizing tsconfig.json
The base tsconfig.json file is useful but not comprehensive enough for our use here. By default, TypeScript will compile all .ts files into .js versions in the directory they are located. We want everything to go into the dist directory.
In addition, we’ll add a few configuration specifications to make fuller use of TypeScript’s power. A full list of configuration options and parameters is available here. We’ll update our file as follows:
{
  "compilerOptions": {
    "module": "commonjs",
    "target": "es2016",
    "esModuleInterop": true,
    "forceConsistentCasingInFileNames": true,
    "skipLibCheck": true
    "sourceMap": true,           // Added
    "noImplicitAny": true,       // Added
    "moduleResolution": "node",  // Added
    "outDir": "dist",            // Added
  },
  "include": [ "src/**/*.ts" ],  // Added
  "exclude": [ "node_modules" ]  // Added
}
The include option tells the TypeScript compiler to target all files in all subdirectories within the src directory. The exclude option makes sure the TypeScript compiler doesn’t dive into any directories associated with project dependencies (i.e. things we are writing.) The outDir option instructs the TypeScript compiler to put all compiled files into the dist folder vs. alongside source files. With this setup, we’re ready to run the TypeScript compiler!
Note: We’re also removing the "strict" : true entry from the tsconfig.json file.
Step 6: Compiling TypeScript into JavaScript
The following command will initialize the TypeScript compiler, at which point it will configure via our tsconfig.json file and then emit compiled JavaScript versions of our files to our dist directory. Running the tsc command will accomplish this or, for Windows users without adequate ExectutionPolicy privileges, the following command:
powershell -ep Bypass -c "tsc"
If all goes well, we should see a few new files created in the dist directory such that our project now reflects the following structure:
.
└── typescript-threejs/
    ├── src/
    │   ├── BasicScene.ts
    │   └── index.ts
    ├── dist/
    │   ├── BasicScene.js
    │   ├── BasicScene.js.map
    │   ├── index.js
    │   └── index.js.map
    └── package.json
The *.js.map files are created because we added the "sourceMap": true option in our tsconfig.json file. This helps produce useful messages during compile errors to help in debugging. Next, let’s create a basic HTML document that we can open in a browser to load the ThreeJS scene.
Step 7: Create index.html
We’ll create a bare-bones HTML file in which our ThreeJS app will be loaded along with some very basic CSS styling. This will load our scripts, create a canvas element, and remove some annoying scroll bars from the window. Add an index.html file in the project root containing the following code:
<!DOCTYPE html>
<html lang="en">
<head>
    <meta charset="UTF-8">
    <title>ThreeJS & TypeScript</title>

    <!-- loads some basic CSS resets and Styles -->
    <style>
        html, body, canvas {margin: 0;padding: 0;border: 0;}
        canvas {display: block;}
    </style>
</head>
<body>

<!-- Application Canvas -->
<canvas id="app"></canvas>

<!-- this needs to be called here to ensure all elements are available -->
<script src="dist/index.js" type="application/javascript"></script>

</body>
</html>
With this file, we’re ready to launch our application via a webserver of your choosing. Personally, I’m developing within Webstorm and find the build-in HTTP dev server to be very convenient. For readers using the command line only, I would suggest researching the webpack dev server. With a server up and running, loading our index.html file show us — a blank screen. Something has gone wrong! By using built-in browser inspection tools (Shift + Ctrl + i) click the console view. You should see the following error message:
Uncaught ReferenceError: exports is not defined
    at index.js:5:23
Inspecting line 5 column 23 of our index.js file as indicated, we see the following line of code (all of line 5):
Object.defineProperty(exports, "__esModule", { value: true });
This relates to how our import of BasicScene into our index.ts file. If we had crammed all the code into a single index.ts we wouldn’t have this issue. This line indicates how JavaScript interprets import/export statements found in the BasicScene file using our specified commonjs module option in our tsconfig.json file. Most modern browsers support import/export statements but do not support importing modules.
Step 8: Configure File Bundling via Webpack
Three, dat.GUI, and OrbitalControls are all being imported as modules that will not work — these resources need to be available directly within the code loaded in the web browser. For simplicity, we are going to use Webpack to “bundle” all our compiled TypeScript files into a single output file that can be easily loaded in the browser.
Webpack uses a file named webpack.config.js by default for configuration settings. Unfortunately, there is no auto-generation method for this file — which will make sense once we see the project-specific nature of these configurations. Create a webpack.config.js file in the project root with the following code:
const path = require('path');

module.exports = {
    mode: 'none',
    entry: './src/index.ts',
    output: {
        path: path.resolve(__dirname, 'dist'),
        filename: 'main.js'
    },
    resolve: {
        extensions: ['.tsx', '.ts', '.js', '.jsx']
    },
    module: {
        rules: [
            {
                use: 'ts-loader',
                exclude: /node_modules/,
            }
        ]
    }
};
This reflects a minimal configuration setup only budling TypeScript files. Webpack can be used for much more. Check out the documentation for Webpack’s config files here for more insight. Important options to note here are as follows:
- mode – controls the format of the emitted code. Options include
production,developmentandnone— the latter emitting a human-friendly format. - entry – the file from which Webpack’s dependency graph (tree) is constructed
- output – Filepath of the single emitted bundled file — named
main.jshere. - resolve – File types resolvable by Webpack during bundling — the
.jsextensions are needed here to ensure a seamless import of theOrbitalControlsmodule. - module – Configures Webpack to use the
ts-loaderpackage which allows the integration with TypeScript.
With this file created, our TypeScript files already compiled, and the webpack-cli module installed, we can now run the command to bundle our TypeScript-compiled .js files into a single, browser-loadable asset via the webpack build command. For Windows users without adequate ExecutionPolicies (again) the following command should work:
powershell -ep Bypass -c "webpack build"
You should see some output in the console window indicating progress as well as some metadata about the created files, source files, and where/when code is generated. Since we have the ts-loader module installed and specified in our webpack.config.js file we don’t have to worry about running the tsc commands to compile our TypeScript anymore — Webpack will handle everything!
We need to update our index.html file to load our new Webpack bundle file. Change this line:
<script src="dist/index.js" type="application/javascript"></script>
To this:
<script src="dist/main.js" type="application/javascript"></script>
This will instruct our index.html file to load our new file instead of the TypeScript compiled file with the module imports. In fact, we can delete those original TypeScript-generated .js files. Reloading the index.html file now gives us the following page:
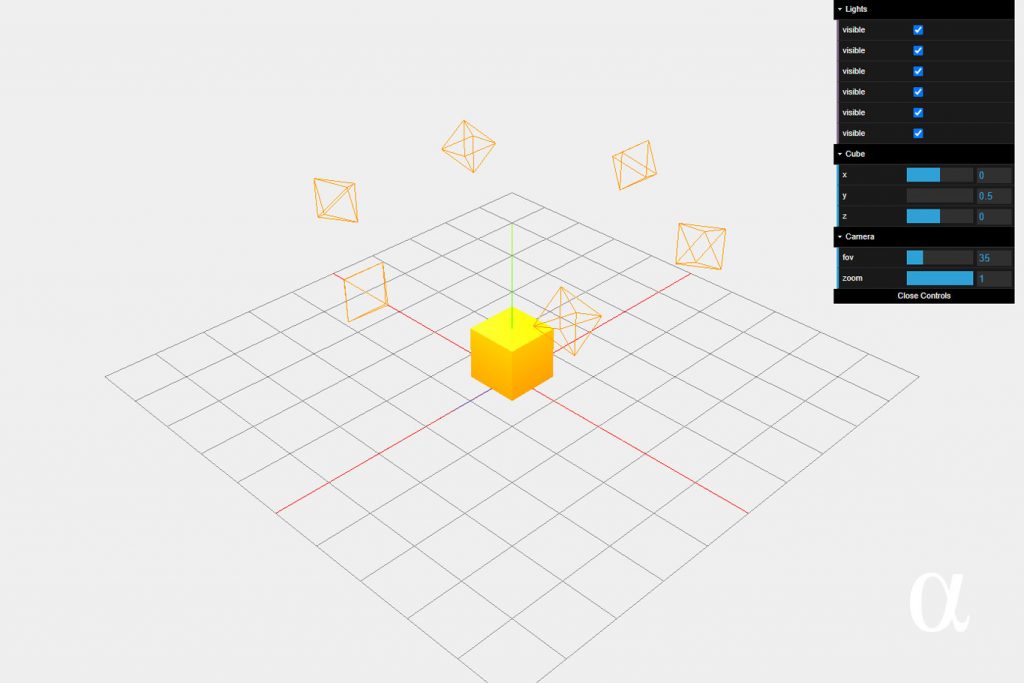
Here we see our scene, all the elements, and even the dat.GUI debug window on the top-right side of the browser window! Looking in the console view of the browser inspector will show the following warning:
WARNING: Multiple instances of Three.js being imported.
This is a warning — meaning it won’t prevent our application from running. However, it does indicate some avoidable redundancy. The issue is in our use of the OrbitalControls module and can be resolved by adding an alias within the resolve section of our webpack.config.json file as follows:
resolve: {
        alias: {
            three: path.resolve('./node_modules/three')   // <----- Addition
        },
        extensions: ['.ts', '.js']
    },
This ensures that all statements importing three will be aliased to the same location. Re-run the webpack build command, reload the page, and the warning will be gone.
Important Considerations
This article is a bare-bones example of configuring a ThreeJS project to work with TypeScript and Webpack. There are many features of Webpack that can be leveraged for project management. Webpack ties into many modules, such as ts-loader, to integrate with many other technologies as well.
For example, Webpack can compile SCSS/SASS files down into CSS which is a major time-saver. Another popular configuration is automatic file watchers to compile and/or bundle based on file changes. See here to configure watch features.
In addition, ThreeJS is a vast, powerful, diverse project that has virtually no end of possible configurations. The sample scene here is not intended to illustrate any best practice, optimal design pattern, or otherwise superior approach. The inclusion of scene objects, cameras, and lighting was simply to give us something other than a blank screen to look at!
Final Thoughts
We’ve covered a fair amount of ground in this article. By using TypeScript and Webpack alongside ThreeJS we’ve seen how projects can be scaled from the ground up. TypeScript provides the robust features needed for large-scale application development and Webpack keeps everything browser-kosher.
Yes — this entire project could have been coded in vanilla JS and have loaded the ThreeJS library via a CDN. However, configuring TypeScript and Webpack ensures that this project will scale seamlessly as it grows more complex. For even easier scaling, check out the article on integrating TypeScript and Webpack via Webstorm for a fully integrated IDE experience.
References
- Z. Gao, C. Bird and E. T. Barr, “To Type or Not to Type: Quantifying Detectable Bugs in JavaScript,” 2017 IEEE/ACM 39th International Conference on Software Engineering (ICSE), 2017, pp. 758-769, doi: 10.1109/ICSE.2017.75.


