Rust is quickly becoming a popular systems-level programming language. It offers the same speed and low-level access as C-based languages but has a few more safety precautions.
Here we’ll walk through the steps to install Rust for Windows affording a bit of discussion to some common hurdles. By the end of this article, we will have Rust configured, understand the purpose of some basic Rust-based tools, and leave ourselves prepared to determine the best Rust IDE.
Step 1: Download Rust Setup Package
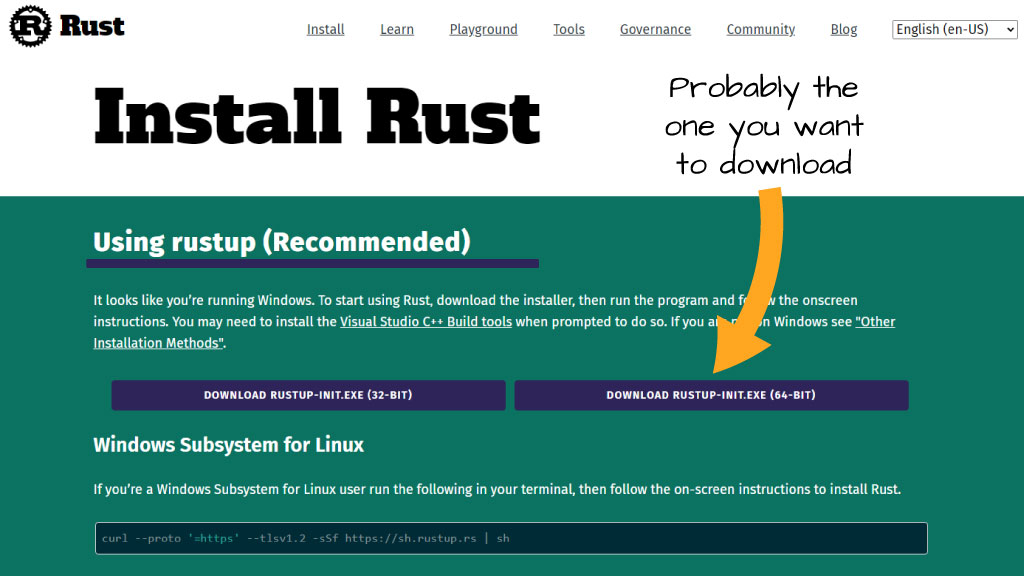
Our first step to installing Rust on Windows is to visit the official Rust download page. This page should automatically present options for downloading the Windows-based version. You can confirm this by checking the statement “It looks like you’re running Windows” is present at the top of the page.
Step 2: Run Rustup-init.exe
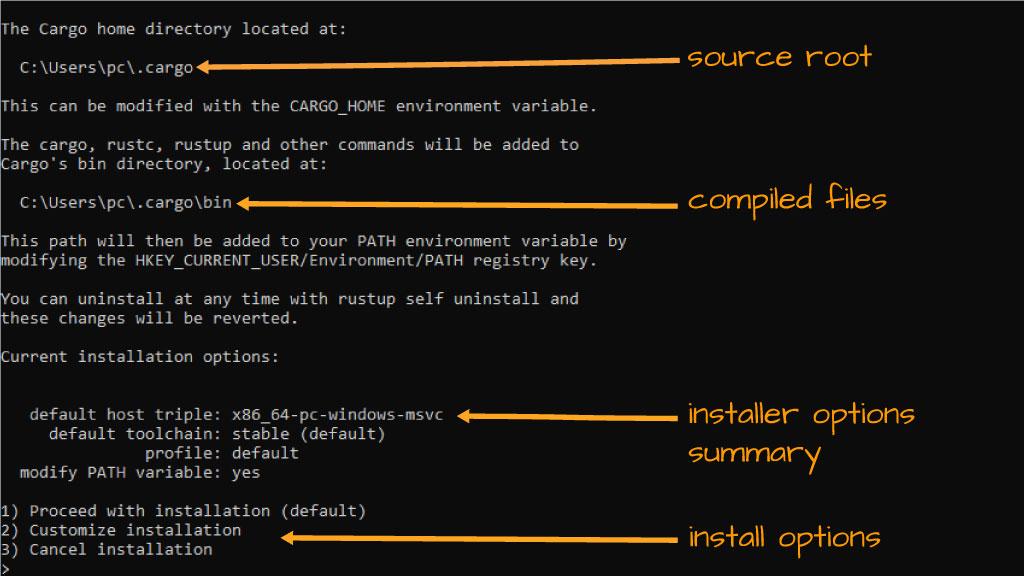
After downloading an approximately 8MB file, users can initiate the Rust installation process by double-clicking the executable—just as one would with any other Windows installer. Choosing option 2 will allow one to make such customizations as choosing a different installation directory, choosing a different build (nightly, beta), and other similar decisions. See here for a more in-depth discussion on custom installations. Here we will be moving forward with the defaults, specified by option 1.
Step 2.b: Install Visual Studio C++ Build Tools
Rust requires the ability to compile files during installation—which requires Visual Studio’s C++ Build Tools on Windows-based systems. If you have a previously-installed version of Visual Studio chances are you already have the C++ Build Tools installed. If prompted, however, you may need to download and install the official Visual Studio C++ Build Tools from Microsoft. Note: Visual Studio C++ Build Tools a relatively large file and requires a system restart after installation.
Step 3: Wait for Install to Complete
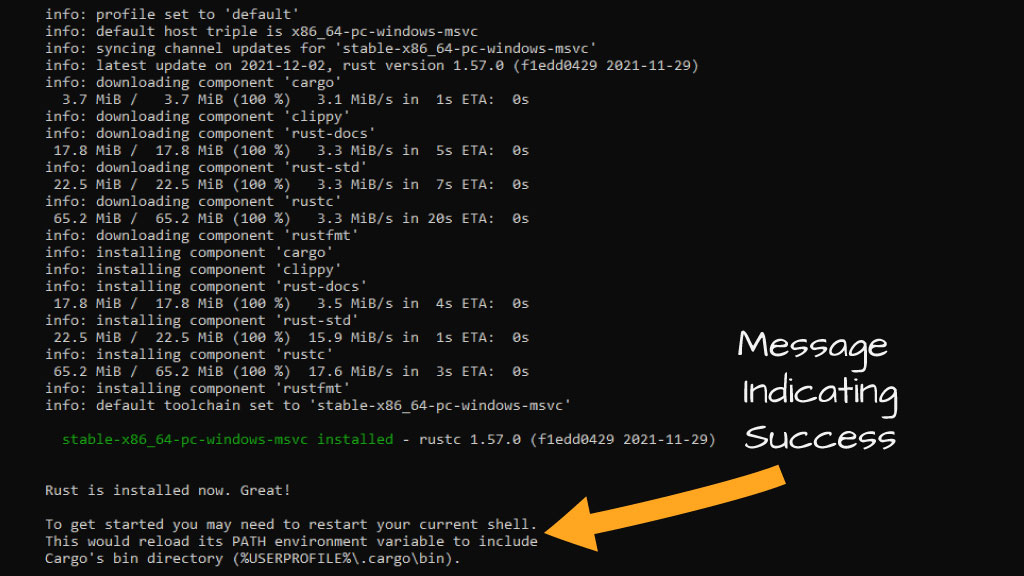
Assuming the VC C++ Build Tools have been installed, the Rustup installer will download and install several packages. A brief summary of these packages and their purpose/use is below:
- Cargo – The package manager and build tool for Rust
- Clippy – The standard Rust linter
- Rust-Docs – Built-in documentation
- Rust-std – The Standard Library for Rust
- Rustc – Rusts compiler, often used via Cargo
- Rustfmt – An open-sourced code formatting tool
On a successful installation, the terminal will convey a message about needing to restart the shell in order for Rust to properly function. This is so the PATH variable can be reloaded and cmd line arguments are associated with the rust binaries. The installer will update the Windows PATH variable by default.
To confirm this, type ENV into the Windows search bar, launch the System Properties app, click the Environment Variables button, then click the Edit option with the Path variable highlighted. This will open a new window with the full value for inspection or updating. You should now see a (%USERPROFILE%\.cargo\bin) value included where %USERPROFILE% reflects your current profile name.
Step 4: Confirm Installation
After installation has been completed, and the terminal window has been restarted, the following command can easily verify that our Rust installation was successful:
C:\Users\pc>rustc --version

rustc 1.57.0 (f1edd0429 2021-11-29)
The command rustc --version simply returns the current build version and date associated with the new installation. The exact return value here will vary based on when the installation was completed and any custom options that may (or may not) have been specified. For example, electing for nightly builds or beta versions would certainly alter this.
Step 5: Launch a New Project
At this point, Rust should be installed correctly and be ready for action. To get an idea of the process for creating a new project, use the following command:
cargo new alpharithms
This command will generate a new Rust package which by default will create a new binary program. This will result in the creation of a new project folder named alpharithms with the following file structure:
.
└── alpharithms/
    ├── .git
    ├── .gitignore
    ├── Cargo.toml
    └── src/
        └── main.rs
There are a couple of things worth noting here. First, notice that cargo has automatically created a .git directory and a .gitignore file. These are involved in the GIT version control system and are created by default when using the Cargo new function. Passing the --vcs none argument will prevent this. Check out the documentation for Cargo for more on possible configurations.
Also worth noting is the Cargo.toml file. This is a manifest file and an essential part of any Rust project. This file contains information about the project, its dependencies, and information needed by Rustc to compile one’s programs. This file is created automatically and is based on the TOML specs.
Final Thoughts
This quick walkthrough should provide one with all the necessary steps to install Rust on a Windows system. For considerations on customizations, advanced troubleshooting, or a deeper dive into any one of the many tools we glazed past here—check out the official Rust documentation (Rust Book) here. Rust hasn’t quite topped the charts of the most popular programming languages. However, it’s quickly becoming a go-to choice for many systems-level projects.


